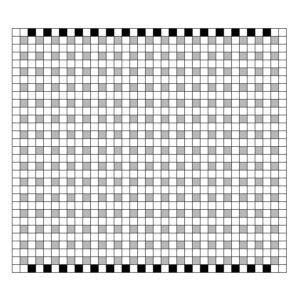
In 2009 I designed a blank chart for creating new pattern weaves on a 4 inch loom. Today I finally finished making it into a free interactive website app (or more accurately, I finished it at 2am )
You can use the chart to draw your design, preview what it will look like when woven (including a custom colour selector so you can see what it will look like if you use a different colour on a layer), and create the pattern in text.
I’ve also included optional preset patterns from three vintage booklets that you can use as-is, or edit to create a new design.
Please feel free to let me know if you have any questions, or would like me to add your original designs as a preset pattern for others to use.
My son Charlie recently finished his very first year at school and wanted to give Christmas presents to his teachers. Since I’m raising him properly, cough, he knows that the best things in life are hand made! Of course, being me, they had to made at least partly of wool and they just wouldn’t be as special if Charlie wasn’t involved in making them.
I find weaving is a great textile technique for children. They can make something quickly, try different techniques as they get older and you really only need a board with some nails or a piece of cardboard to get started (if you have older children a pvc pipe loom is a great option as well. It’s faster to weave on and more versatile).
The first thing we made was a blanket using bulky weight yarns (or several strands together to make up a bulky weight) on a Martha Stewart Loom.
I had 13 of the squares already made so we only had three to go, which was great because I only had 3 weeks to get everything finished. Charlie wove the bright purple square almost entirely by himself and added some needle felteddecoration usingthe cookie cutter method.
I’ve read that this loom isn’t very good for knitting but I love it for weaving. Charlie and I wove our squares using the weavette or zoom loom continuous thread technique on the loom with the largest square configuration, which means using all of the straight pieces in the kit. I fudged the corners but once they’re crocheted together you can’t tell so it really doesn’t matter.
For his other teacher we made a scarf on a rigid heddle loom.
The yarn is dk weight handspun merino and alpaca and, as you can tell, I didn’t have time to sample the yarns together and the merino shrank in the wash, while the alpaca didn’t. Oops. Considering how much I had fulled the merino, I really didn’t expect it to shrink but there you go, it did. His teacher loved it anyway :). I’m thinking of weaving some yardage using the rest of the purple and blue/green but I’ll have to search the stash for some other colours to put in to make up enough for either a winter skirt or a jacket. Probably a skirt as a plaid jacket would be a bit too, um, daring, I think.
Since this is my last post before Christmas, I want to wish you all a merry one, and if you don’t celebrate Christmas have a simply smashing week! I’ll be back with more free lace edgings a week from Monday, right after I’ve recovered from eating far too many mince pies…
and anyone else who wants to make their own patterns for a 4 x 4″ weavette loom
This is a blank chart that I made for making up my own designs. Please feel free to use it for personal use only. You may use it to make charts to share for free.
Leave a comment if you’d like more instructions on how to use it.
Apologies for my continuing absence. I’ve been napping a lot in between crafting, visiting the midwives clinic and having all those fun (not) tests that are inflicted upon pregnant women.
Speaking of crafting, since that’s what you’re here for, I thought I’d write a few posts about what I have been making for my 15 year old daughter and son-in-progress. I’ll post all out of order and start with the things I have made for my daughter.
First of all is the Texture Shawl Collar Jacket from Patons Australia, booklet #1264, Inca Fashion Knits. I actually received the pattern as a freebee from Stitches magazine so I don’t have the whole booklet.
(oops, the pic seems to have been lost during a website update. Sorry)
It looks quite baggy in this photo but in reality it fits very well. Slouchy teens, what can you do 😉
I really enjoyed knitting this jacket. The stitch pattern is easy to remember but changes enough to keep it interesting and it works up really fast. I really like the Patons pattern books as Brittany likes many of the designs and many them are written in sizes small enough for her.
I knit the small size and made the whole thing 4.5cm shorter because Brit is so tiny (for our family, lol) and used 2.5 balls of yarn less because of the shortening.
I would keep this particular yarn for special garments. It’s loosely spun so it wouldn’t stand up to a lot of wear and tear, but for a special garment I find it really nice and would definitely use it again. The buttons are (I assume lasercut) coconut shell which I bought at Spotlight for $5 each. Actually, the hardest part of this jacket was finding the buttons!
Next up is a Hello Kitty Mini-Tote that I crocheted for Brittany’s birthday last week.
I used the face pattern from a backpack and made two granny squares for the purse section. It’s made from Cleckheaton Country 8 ply (dk weight) wool and lined with some red cotton. The eyes are felt stuck on with washable craft glue. I’ve been crafting from patterns a lot lately and it was nice to make up a pattern on the fly for a change.
Speaking of things that are different, this is Gary the evil sock monkey.
Front:
and back (so you can see his wings):
Gary is a basic sock monkey with quilted wings.
To make the wings I drew a basic wing shape on a piece of paper. Then I cut 2 out of black homespun cotton and one from a medium weight quilt batting.
I stitched the batting and fabric together with the two layers of fabric on the bottom and batting on top, leaving a gap for turning. I then trimmed the batting from the seam allowance, turned it right side out and hand stitched the gap closed. Finally I finished off by stitching the triangles inside the wings to create the detail. It’s a lot easier than it sounds, I swear 🙂
Of course all evil flying sock monkeys need a best friend, so when I saw this pattern featured on the Craft: magazine blog, I had to make one!
That’s all of my crafting for teens at the moment. Tomorrow: baby blankets!
I don’t usually put tutorials straight in the blog but I couldn’t wait to finish my rug to show you this!
I will eventually put the measurements of the loom and detailed instructions for several projects on the small looms page but I really wanted to show you this much now 🙂
About 6 months ago I saw some vintage rag rug looms on ebay. Postage from the US to Australia was prohibitive because they were so heavy, so I copied down the measurements in the description and my Dad made me one.
It’s about 20 inches long with a cup hook at the front for tensioning the warp, two posts at the back for sitting your spools of warp on, and a perpendicular piece of wood with two slits in it for keeping the warp tensioned and at an angle so you can get your hands underneath for speedy knot tying (for the sake of this tutorial I’m going to call this the “tensioning post”). If you’re a woodworker please feel free to make and sell these. We need to keep the old crafts alive!
Here’s how to make the ghiordes knots. (I have read the ghiordes rhymes with forties, but I’ve never heard anyone say it out loud)!
First, cut your strips of fabric. For my first try I have cut them 1 x 3 inches. I’m using fabrics that are mostly cotton that were left over from a Suffolk puff quilt that I made last year. (I’m going to experiment with other fabrics later on).
Tie your two warp ends together and put the knot in front of the cup hook. Pull the warp tight, thread it into the slots on the upright bit of wood and make a few loops over the outside edges to keep it tight.
Take one of the strips of fabric and fold it in half lengthwise. Hold it across the top of the warp. (I usually make knots with two hands but one hand was holding the camera).
Fold the ends to the back, around the warp threads.
Pull the ends to the front, between the two warp threads. Use the ends to pull the knot down towards the cup hook. As you add more knots, keep pulling them down towards the ones already formed as you pull them tight.
This is what a length of finished knots will look like.
When you have made a lot of knots it will become difficult to tighten new ones because the warp will want to pull them apart again. When this happens, untie the warp threads from the tensioning post, take the other end of your warp off the cup hook, move it along and retie the warps on the tensioning post. The last ghiordes knot you made should be in front of the cup hook.
Keep making knots until you run out of warp or it’s long enough. Whichever comes first.
To make a rug you twist your length of knots into a large flat spiral, keeping the pile on one side. Stitch the fabric together on the back with a strong thread. I don’t have any tips for this part yet as I haven’t got that far.
You can also use these knotted lengths for other things. I’m going to try making some with 6 inch long strips of fabric, then trap it in the seam of a cushion for a rag strip fringe.
I also made a long piece with yarn. I could see making three long strips and tying them together at regular intervals with another piece of yarn to make a big, thick, fluffy boa.
I’m going to have fun playing with this. It’s remarkably quick to make. I’ll show you the rug when it’s finished 🙂
 )
)


