Charlie would like everyone to know that light blue and pale yellow make a really good vanilla colour.

I think he’s right!
Charlie would like everyone to know that light blue and pale yellow make a really good vanilla colour.
I think he’s right!
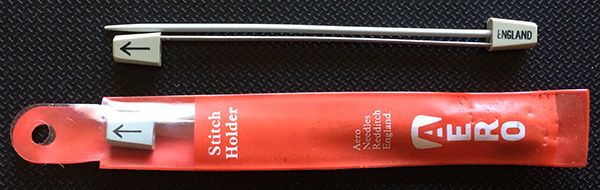
I have a few stitch holders in my collection that consist of a pin with a cap on the end, sadly unused as I always use a scrap of doubled yarn instead. It never really occurred to me when they might have first been manufactured until I saw this excerpt from the Launceston Examiner,Thursday 23rd February 1950.
From Knitting News To Bags And Nylons From Italy
Window Shopping with PENELOPE
MOST of the big stores are showing their new season’s stocks of wool, including five brand new shades-a soft mauve, a deep purple, and a green, blue and teal mixture.
A handy new aid for knitters is a stitch-holder, selling for 1/
Instead of the old safety-pin type of holder, this has one side formed by an expanding spring, which makes it suitable for holding even the heaviest and thickest of garments.
I can’t say that I’ve ever found them terribly useful for anything other than holding the stitches for button bands that are knit after the body of a cardigan. The ones I have are either too short for anything else or too stiff for holding longer sections of knitting. I’ll stick to my doubled piece of yarn. It doesn’t matter if you lose that down the side of the couch!

From The Sydney Morning Herald, Monday 13th March 1922
The old adage that there is nothing new under the sun was never better exemplified than in the “Jazz” or colour design knitting which has become such a rage in England this season.
Most war-time knitters will remember a modest little book entitled “How to Knit Initials and Battalion Colours,” which was published on the first War Chest day, and which gave directions how to twist the wool used for the design with that used for the ground colour in order to avoid loops at the back of the work. The book contained a series of charts marked off in squares as a guide to the worker. Expert knitters soon outgrew those simple diagrams, and evolved most intricate devices, one lady growing quite famous for her pictured socks. Now the idea which became so familiar to us in Australia has been rediscovered and under the name of jazz knitting is being utilised for the adornment of all manner of knitted garments. Jumpers have gay coloured borders in conventional or floral designs, knitted skirts and scarfs are similarly treated; dresses are decorated at the edge of neck, sleeves, and skirt, woolly bonnets for children have a dainty trail of forget-me-nots and rosebuds worked in the reveres which roll softly back from the face and the long gauntlet gloves, which are so fashionable, achieve an air of distinction by means of a motif in colours to match that upon the scarf or jumper. In fact, colour knitting is employed wherever we are accustomed to find the more familiar embroidery or beading. The work is easily done and takes but little longer than plain knitting. For those who have never attempted to knit a design in colour a few directions will prove helpful.
Designs for cross-stitch embroidery, beading, or filet crochet are very suitable for this work, and there are fascinating possibilities in working out the colour scheme. For instance, in a border design of conventionalised roses, connected by trailing stems, the flowers are of pale yellow with orange centres, the leaves und stems of autumn brown, the background itself being cream. Before beginning to work, it is wiser to mark out the design on squared paper – an exercise book ready ruled may be purchased at any stationers for a trifling sum. Each square represents a stitch, and it is far less tiring to the eye to follow these larger squares when knitting the design. The various colours to be used may be indicated with coloured chalks or by different symbols, such as dots, crosses, daggers, and stars. Next arrange where the design is to appear, and ascertain whether it will fit in without alteration. For instance, if you intend working a border in a jumper, count the number of stitches on your needles and divide by the number of stitches which are contained in each repeat of the design, remembering to place the centre of a motif exactly in the centre front and centre back. A little adjustment of the design may be found to be necessary, but this is easily effected if done before commencing the work. Colour pattern knitting is always done in stocking stitch with the pattern on the right (knit side), and the twisted in colours on the wrong (purl) side. Either wool or silk may be employed, but the pattern colour wool or silk must be of slightly heavier thickness than that used for the ground colour.

It is better to join in a fresh strand for each repeat of the pattern, and so obviate carrying on the pattern wool across large spaces occupied by the background colour only. A little practice, however, will soon illustrate where this method is preferable. It is a good plan to weave in the coloured wool some six or eight stitches before commencing and after completing the pattern by passing it at each stitch over the wool with which you are knitting, being careful to keep it at the back of the work. Both wools are held in the hand, and are twisted round the little finger, just as though on thread were used. In making a stitch, insert the needle in the usual way, cross the wool not used over the wool to be used, hold the former down over the first finger and the left hand, and complete the stitch. It sounds rather complex but the motions become perfectly automatic after a very little practice. When you change the colour you will notice that it is not necessary to twist the wools. Purl stitches are worked in similar fashion, the only difference being that as both wools are then in front of the needle, the wool which is being held down must be held over the needle as well.
Remember to twist the thread which you are carrying along very loosely, or you will pucker the pattern. Remember, also, to read the chart from left to right, and then from right to left as you knit and purl alternately. By using a pin to mark your place you will avoid all possibility of mistake.
When the pattern is completed you can cut off all loose ends if you have woven in the wools when commencing and finishing each strand, otherwise all ends must be carefully and neatly run in at the back of the work with a darning needle.
Before making up the garment press each section separately on the right side with a hot iron used over a wet cloth.

Charlie’s latest request for a rainbow loom project was for me to make him a basket. There are a lot of videos on making baskets and bags andit took me quite a lot of video watching to find what I consider to be the best one.
Craft Life have once again come through with a very cute project and high quality video. Click here for Craft Life’s rainbow loom basket tutorial.
Now, I need to buy another loom and find an equally good video on making a bag because he wants something flat and larger, lol (no, I do not indulge my children that much! He’s saved up for his own loom and as soon as the local shop gets one in I’ll be borrowing it).
I’ve been a knitter of sorts for almost 40 years and can confidently say that if I can imagine it, I can knit it. However there’s one thing that I’ve never been 100% sure about: darning in my ends. My darns are always secure and neat but after hearing a judge at a knitting competition say that that best knitters darn in their ends so you can’t even find them, my confidence in my technique flew right out the window (along with any desire to enter any more knitting competitions).
The Purl Bee has set me straight with her tutorial on eight different ways to darn in your ends when knitting. I was doing it properly all along!
The Purl Bee is a great blog, not just for this article. So even if you know how to darn in your ends when you knit, check it out anyway. You’ll be glad you did!