Menu Close

Category: Sewing

A little bit of sewing

Grab yourself a coffee, this is going to be a long one… (apologies for the missing images. Flickr deleted them from my account).

I have discovered that it’s a lot easier to sew in small bursts than knit. With a 10 1/2 month old baby it’s very important to be able to throw down whatever you’re doing at a moment’s notice to rescue him from being stuck under a kitchen chair (for example) and not lose your place in your project. Not losing your place is especially important since by the time you pick it up and figure out where you’re up to the baby has gotten himself stuck under the kitchen chair* again and you haven’t made any progress.

It’s also far too hot to knit or crochet, so this is what I’ve been up to over the last month or two.

Firstly, I finished the 21 pairs of baby pants!

These pants were all made from patterns that I drafted. For the pattern I used the flat trouser block from Metric Pattern Cutting for Children’s Wear and Babywear: From Birth to 14 Years by Winifred Aldrich. Two of the fleece pants were made with a two-piece pattern and the rest were one piece. The two piece pattern was made by cutting the block in half and adding seam allowance so I could get an extra 2 pairs out of my dwindling fabric.

Firstly, we have baby stretch-knit shorts. All made on my fabulous new overlocker from op-shop fabric. I went into the op shop one day thinking “I’d like to find some blue and brown knit fabrics to make the baby shorts” and found exactly that in the very first op shop I went into. I’d say that doesn’t happen often but the truth is I seem to have some weird kind of op-shopping mojo and I often find exactly what I’m looking for. I don’t find everything but it happens a great deal 🙂

(missing image)

Baby nerd shorts. Nerds are cool, therefore my baby needs baby nerd shorts. These are also op shop fabric. I don’t know what the fabrics are but these are real favourite “going out” shorts. The green is woven but very elastic so I’m guessing maybe there’s some lycra in it or something. The green ones are also known as Charlie’s golfing shorts.

(missing image)

Blue baby camo pants. Lightweight cotton drill. The fabric from these was from the $2/m discard bin at Spotlight in Wollongong. I bought a meter, which should have provided me with enough fabric for a pair of shorts as well but it was cut really crooked so I didn’t have quite enough for the shorts. Boo to the person who cut it. Oh well, at least there’s enough left to do something with. I just don’t know what yet 😛

(missing image)

Baby track pants. All op shop fabric! I spent about $20 on various fleecy over the Winter. It turned out to be an AWFUL lot of fabric. I swear there was something like 3 or 4 meters of the orange. However a redheaded baby can only wear so much orange before looking like a piece of fruit, so I only made pants, no sloppy joes with it.

(missing image)

Long pyjama pants

Half of these get worn as daytime pants so maybe I should call them “versatile pants” or something…

Spotty and stripy cotton pants. This fabric was from Spotlight, about $4 per meter. I managed to get shorts out of them too. I love this fabric, it’s easy to sew and doesn’t cost much.

(missing image)

These are made from a light vintage cotton that I found in an op shop in Dapto. Dapto has some really great op shops. It has little horses wearing hats on it.
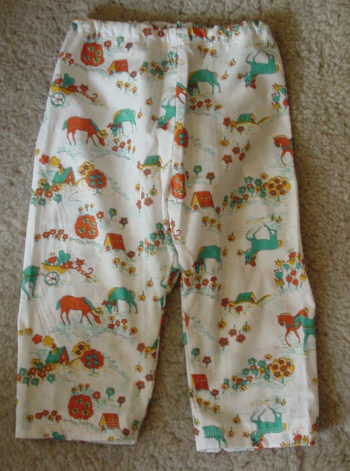
Baby pyjama pants

Another op shop find: stretch knit with trucks, tractors, cranes and bulldozers.

Baby knit pyjama pants

Microfibre pirate print, $5/m from Spotlight. I hate sewing microfibre. I need to learn more about how to control it. These kept gathering up as I was sewing.

(missing image)

Short pyjama pants

Yet more op shop fabric. The local op shops have such great fabric that I buy a lot there.
These are a very lightweight cotton with little dinosaurs driving trains. I don’t know why dinosaurs would be driving trains but there you go.

Baby pyjama shorts with trains

and these are the shorts I made from the previously mentioned spotty and stripy fabric.

Short baby pyjama pants

That’s it for the baby pants! Here’s a cost breakdown for anyone who might be interested:
# 1 pair of red plaid shorts from op-shop fabric. Cost approx 50c
# 4 pairs of jersey knit shorts from op shop fabric. Approx cost 50c each
# 1 pair of blue sky camo pants from $2/m clearance fabric from Spotlight. Cost approx $1.25
# 1 long and 1 short pair of pyjama pants — aqua with white dots. Cost approx $2 per pair
# 1 long and 1 short pair of pyjama pants — red and white stripe. Cost approx $2 per pair
# 1 pair of lime green plaid shorts from op-shop fabric. Cost approx 50c
# 1 pair of long microfibre pirate skull pyjama pants from $5/m clearance fabric. Cost approx $2.50
# 1 pair long jersey knit pyjama pants with trucks, cranes and bulldozers. Op shop fabric. Cost approx $2
# 1 pair short cotton pyjama pants with dinosaurs driving trains. Op-shop fabric. Cost approx $1.50
# 1 pair long cotton pyjama pants with horses wearing hats. Vintage op-shop fabric. Cost approx $1
# 6 pairs of long winter fleece track pants. Op-shop fabrics. Cost approx 50c to $1 per pair

I have also been sewing for my daughter. She gives me most of the ideas and then I see what I can come up with.

She’s going on her very first overseas trip soon so I made her this passport holder so she could keep postcards and stamps and whatnot in it as well. The outer fabric was a fat quarter that I bought for something else (not enough fabric), some brown satin binding from the op shop and for the pockets I used some fabric oddments that were given to me as a gift. I made the pattern up. It’s a bit wonky but who cares 😛

(missing images)

Magic apron

The magic apron is from “First Steps in Dressmaking” by the Woman’s Institute of Domestic Arts and Sciences Scranton PA 1949 Edition. It’s named thus because you draw the pattern straight onto the fabric and don’t need a paper pattern.

I really enjoyed the embroidery around the edges. I made a mistake on the strap (I folded it to the front instead of the back) but she didn’t mind so I left it that way. Next time I would make the seam allowances bigger than the 1/4″ in the pattern but that’s the only change I’d make.

Gingham magic apron

Shirred sun dress made from a souvenir sarong.

I fought hard with my machines to sew the shirring. I tried the sewing machine and couldn’t get it to gather. Then I tried the chain stitch on my overlocker and the elastic snapped. I ended up sewing 14 rows of 3.5mm long and 3.5mm wide zig-zag stitch with my sewing machine and threaded the elastic through it on the wrong side. An inelegant solution but it looks fine on the outside 🙂

Things I will try are loosening the tension on the chain stitch looper on the overlocker to the point where the elastic doesn’t break any more and see if that gathers. I’ve also seen the hint that if you have a sewing machine with a drop in bobbin, to try putting the bobbin in the other way around.

My shirring rows are approximately 1.5cm apart and 5cm longer than the measurement from underarm to the point where I wanted it to finish. Elastic was cut 5cm shorter than the under bust measurement (don’t worry if it shrinks after cutting).

Shirred sun dress

Two simple floral hipster skirts.

Drafted from instructions in Metric Pattern Cutting by Winifred Aldrich (4th edition).
Waistband: Hipster waistband, page 96
Skirt: Slightly gathered skirt block, page 85
Once again this fabric was from the $2/m bin at Spotlight.

Floral skirt
Floral skirt

(missing image)

8 gore skirt with faced waistband.

I didn’t have enough fabric to make it as long as the blue skirt with suffolk puff trim (below) so I lowered the top to make it sit lower on the hips.

Pattern was traced from an existing skirt. I made small adjustments to the fit, added belt loops and lowered the top of the skirt.

Next time I would either slightly gather the trim or put little pleats where it meets a seam in the skirt.

Floral skirt laid out flat

8 gore skirt with suffolk puff trim

This skirt was made with the same pattern as the previous skirt. The waist sits a little higher on the hips because I had more fabric.

The main fabric is a medium weight cotton, $5 from the op shop and the suffolk puffs are made from scraps.

Skirt with suffolk puff trim
Suffolk puff skirt

The suffolk puff trim on the skirt led to “Mum can you make me a blanket with those too?”
142 x 6cm suffolk puffs – it will take 900 to make a coverlet

142 Suffolk puffs

Which led to me thinking I should use the smaller scraps to make myself one with 4.5cm suffolk puffs

62 x 4.5cm suffolk puffs – it will take 1,600 to make my coverlet. I made one before.

(missing image)

I use the Clover Quick Yo-Yo Makers to make my suffolk puffs. Below is a tutorial on using them which I put on youtube, or you can find out how to make them without any special tools by Heather Bailey.

But even after making two different size suffolk puffs I still had some usable pieces of fabric left. I decided they would make a great english pieced quilt. My hexagons are one inch along each side and I’m using commercial die-cut templates because I didn’t think of printing the hexagons and cutting them out of cereal boxes until just now, lol.

English paper piecing is very easy to do. I’ve never done it before and mine’s turning out great. You can find a tutorial by Sunshine’s Creations here.

Unlike Wendy, I have stitched through the paper when basting but that’s because this is the first time I’ve used the technique rather than disliking the technique she has used. I’m in no hurry to finish it so I don’t mind if I have to remove the basting before quilting.

English pieced hexagons
English pieced hexagons 5

Then I got side tracked by a big back of leftover fleecy fabric. It kept taunting me because even though I had made 19 baby bibs, 4 pairs of size 0 baby pants, 6 pairs of size 1 baby pants, two easter rabbits, one cosmonaut, one baby blanket and used some as the batting in three baby quilts, there was still a load left. So I cut out a load of 21cm squares and overlocked them into a fleecy quilt, 160cm high x 180cm wide for Winter TV watching.

(missing image)

I still have to tie-quilt it. I’m going to use a lime green number 5 perle cotton and have the tied ends on the back (I think). The thread is a few shades darker than the fabric. I’ve never made a tied quilt before so there’s another technique for my repertoire 😛

The backing is a 1970’s vintage sheet that was almost on it’s last legs. It was too cute to send to the rag bin so I thought I’d extend it’s life a bit. If it gets holes in it I can always patch it.

My butterfly and shamrock quick yo-yo makers arrived the other day but I haven’t had time to play with them yet. Unfortunately Charlie thinks they’re baby toys because of the brightly coloured plastic and he’s stopped napping due to some new teeth. I’ll make some samples as soon as he starts napping again and write a review.

Well that’s about it! I’m off to open some doors and hopefully get a breeze through the house. It’s supposed to be in the mid 30’s Celsius tomorrow. Yuck.
* Really. He does that a lot. I’d put the chairs somewhere else only that’s where I sew 😉

Still Breathing :)

I know it’s been several months since I last posted. It’s amazing just how much time running around after a baby can take! It’s also amazing how much mess a newly crawling baby can make whilst roll/crawling around the living room with a teething rusk

Baby Charlie

but I digress…

I have a new overlocker!

Isn’t it beautiful? It’s a Pfaff Creative Coverlock 4874. It’s a 10 thread, 3 needle overlocker. I decided I wanted an overlocker 10 years ago and I finally got around to getting one when I realised that drafting your own sewing patterns isn’t brain surgery 😛

I learnt to sew when I was in highschool but always hated using commercial patterns because they never fit properly and it seemed so fussy to have to alter every pattern every single time you wanted to make something, even when you’ve spent $17 on the pattern itself.

Years later I started buying fabrics from the local op shops and decided to have a go at drafting patterns that are a bit more complicated than elastic waisted skirts (ahem), and it all fell into place. My daughter has 4 new skirts, the baby will soon have 21 new pairs of day/night Summer/Winter pants and I have projects lined up until the end of the universe 🙂

Here’s the next one’s before picture.

(missing pic)

My daughter bought this jacket from the op shop. First I removed the sleeves and shoulder pads, and then pinned the sides in above the waist to make it a more fitted shape. I still have to sew the sides, after which I’ll refit the sleeves and add a gathered broderie anglaise style lace to the cuffs, replace the buttons and give it a good wash. Next time I’ll wash first, lol.

As for the overlocker, it’s incredibly easy to use. Easy to thread, easy to engage and disengage the upper looper and knife and super easy to understand. The only thing I would have liked to be different is to have better threading guides in the instruction book so I don’t have to go to the computer CD animation when I haven’t doe something right. It’s so easy to thread that I pull all the threads out when I want to change them instead of tying on the new thread and pulling it through 🙂

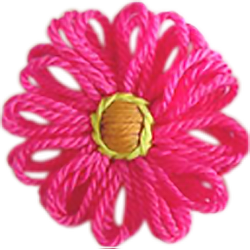
Finally I had some exciting news in my mail yesterday. Clover have re-released the Hana Ami Loom! It’s the Rolls-Royce of flower looms and I suggest everyone should go and buy one right now before they go out of production again!

Hana Ami loom by CLover

A Very Basic Wizard’s Cloak

The topic of sewing a wizard’s cloak came up on Ravelry this morning and I thought it was worth posting my reply here as well, since there are stitchers who don’t knit or crochet and might want to know how to make a basic wizard cloak for their kids.

The question was how to sew a simple wizard cloak for a quick costume. Thanks to an old library book on Elizabethan costuming, I knew the answer 🙂 This is a slightly expanded version of my reply to the original poster.

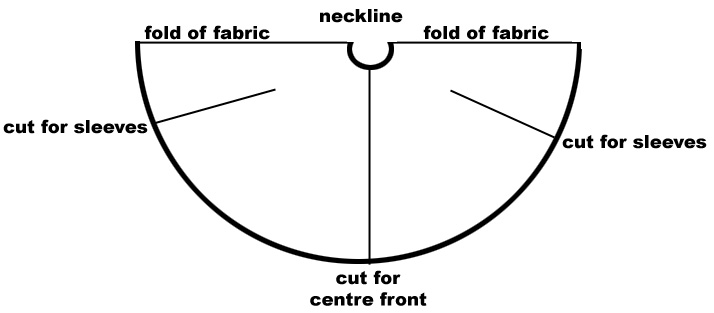
Wizard cloaks are made from a circle.

Big circle with the radius as long as you want the cloak to be. Fold it in half.
Cut a hole in the middle of the circle for the neck.

Cut down the front of the circle for the front opening.

Cut slits for the sleeves, making sure that the bodice is wide enough for the chest measurement with a bit of ease.

Sew sleeves and side seams and hem everything else. Stick a button and a buttonhole on the front. Or ties.
Basic Wizard Cloak Diagram

To make a better finished cloak you can add facings to the neck and front opening.

A fancier cloak might have pockets in the side seams for holding the wizarding essentials (wand, toad, vial of goo etc), or a hood.

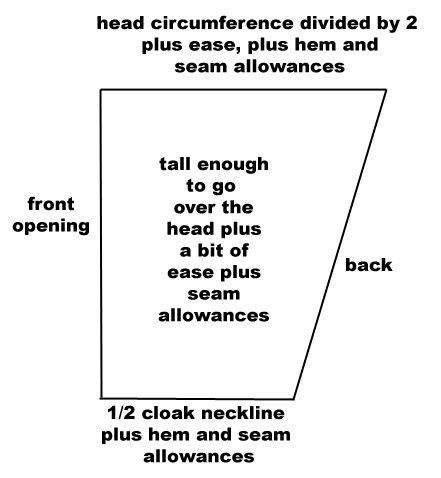
A hood can be made of two pieces of fabric shaped like this

Wizard Cloak Hood Diagram

Sew them together along the top and back, hem the front and sew it to the neckline. Or sew it to the neckline and then hem the hood and the front at the same time (I think that might work).

Click Clack, Stitch Stitch, Sew Sew, Splat Crunch

Ok, technically there is neither a splat nor a crunch, bet hey! Artistic license and all that 🙂
Three or so weeks ago I promised I would upload photos of other projects I had made the next day. Then there was Christmas and New Year’s and swimming and shopping and destashing and…

Let’s just face facts, shall we? This is as fast as I get 🙂

I still don’t have a photo of one of them, but here are the rest.

I finished these wristicuffs for Miss Brittany last night.

Orange wristers

They’re made from some of my very, very early handspun. It’s lumpy and bumpy and dyed with Kool-Aid. It’s also incredibly soft and Brittany asked me to make her something out of it while we were sorting out the garage stash. I wanted to destash it but there you go…

Techy specs – Yarn: lumpy handspun 2 ply merino, approximately aran weight. Spun by me about 10 or 11 (maybe 12) years ago.

Pattern: K1, p1 rib on 4mm needles. 1 inch smaller than wrist circumference (unstretched).
3 inches long

The next projects are quite picture heavy so bear with me. Two Una-na dolls made from the Japanese book by Mimiwn. I love making these dolls. I can see myself becoming quite addicted to making them little clothes and accessories. I had to stop myself buying a little toy kitchen dresser at the op shop the other day because it was the right size for them. (If I had my own, much larger, house I would have bought it).

The black haired one is called Pansy Dollington (Brittany’s) and the brown haired one is mine. Her name is Florence Dollington. Unfortunately Florence has developed a tendency to swear like a sailor when least expected (but definitely *not* when my Dad is around, haha). I suspect she’s got a little bit of a dolly “drinky drinky” problem to tell the truth…

Una-na doll - Pansy Dollington

Una-na doll - Pansy Dollington

I still need to finish sewing Florence’s shirt and skirt. I had to take my sewing machine apart halfway through to clean it, and then everything got put away for Christmas and I haven’t been back to it yet.

This first picture shows her wearing the first unsuccessful wrist warmer as a shoulder warmer type thing. I’m going to put a little felt & button flower on it.

Una-na doll - Florence Dollington

Here she is wearing an early Spring… let’s call it a “ponchette”. (I love that word. It’s so pretentious).

Una-na Doll with Poncho

And finally here she is wearing a ponchette from the same pattern, but in thicker yarn.

Una-na doll with ponchette

Technical details:
The book is unfortunately out of print (Una-na dolls by mimiwn)

The red and beige yarns are discontinued dk weight commercial yarns, and the bright blue is some of my hand dyed handspun yarn with (I think) mohair, angelina fibre and possibly something else thrown in. The blue is 2 ply and a bit finer than fingering weight.
Next is a quickie that I knit at the doctor’s the other day.

Tiny knit Christmas stocking

The mysterious pattern was posted on Cosymakes a few days ago. Since I had just finished all my simple knitting and I had to leave quite soon, I scribbled out the pattern, grabbed needles and yarn and had a go. I just can’t resist small vintage patterns that don’t have pictures 🙂

I love this little stocking boot so much that I’m thinking of making a bunch of them during the year in whatever scraps I still have lying around after my major destash (I’ll get to that BTW).

Techy details: I used thinner yarn and smaller needles than the pattern calls for, but only slightly. The pattern calls for 5mm needles and (I guess) a worsted weight yarn. I used 4mm needles and dk weight. The green is some of my handspun, the purpley red is Jo Sharp DK wool.

Well I think that’s enough for today! I have more projects to share with you but I think I’ll leave them and the story of the destash until tomorrow. I’ve already taken the photos, so you won’t have to wait another three weeks, I swear!

Potterflies and Crochet Trees

I finally had time to fix the thread crochet butterfly that I stuffed up a couple of weeks ago!

Thread crochet butterfly

and followed by getting totally carried away making more butterflies 🙂

The first one was meant to be a potholder but I wanted to make it as a decoration so I used slightly finer yarn than the pattern called for. Behold the potterfly!

Butterfly pot holder

and finally, since you just can’t escape the suffolk puff explosion around here, a suffolk pufferlfy of my own deranged devising.

Suffolk puff butterfly

I made the top of the wings with the extra large Clover quick yoyo maker and the bottom with the large yoyo maker. The body is a rolled up strip of felt bound with size 10 cotton and decorated with some french knots.

I’m still playing with hairpin lace techniques. I just found some more patterns in an antique magazine I was looking through last night. Did you know that hairpin lace is also known as hairpin crochet, fork work, krotchee crochet, fourche work, Portuguese lace, Maltese lace and Maltese work? If you’re looking through vintage or antique publications and see references to any of these techniques they may refer to hairpin crochet. Maltese lace and Portuguese lace also refer to bobbin lace and other crochet styles so it depends on the individual pattern. Some patterns just marked as crochet also contain hairpin lacework so it pays to keep your eyes peeled. I had no idea I had so many hairpin lace patterns and techniques in my little collection of antique books and magazines until I read through them all.

Anyway, here’s what I’ve been doing. Since I won’t be adding the hairpin lace section to knitting-and.com until after my brother’s wedding (next Sunday), I’ll put some rudimentary instructions here in the blog for the time being.

First of all, I have come up with a pleasing and extremely simple design for a stole that I want to make for Sunday. (I hope the yarn arrives today!)

Hairpin lace swatch for a stole

Made with fingering weight yarn on a two and a quarter inch staple.

The strips of crochet are made with the double stitch, meaning you work 2 double crochet (US single crochet) into the front of each loop before turning the fork instead of just one. The hairpin braid is then joined together using the cable join as shown here on the Stitch Diva website, but joining two loops through two instead of single loops as shown in the tutorial.

I’m going to make my stole 6ft long (I’m 6ft tall in flat shoes), with white fingering weight yarn, and as wide as I can make it before I run out of time. I want it to be at least 12 inches wide, I hope to make it 24 inches wide though so I’ll need 12 – 25 strips. Wish me luck 🙂

I also had a go at tree stitch, which is great fun to work and makes a really interesting centre to the braid.

Hairpin lace tree stitch in crochet

To work tree stitch, work a slip stitch into the front of the large loop on the fork, pass the crochet hook under the front thread of the large loop, yarn round hook and draw through (2 loops on hook), *yarn round hook, pass the hook under the front thread of the large loop, yarn round hook, draw loop through** (4 loops on hook), repeat from * to ** once more (6 loops on hook), yarn round hook and draw through all 6 loops on the hook. Turn the fork and repeat for the next stitch. It’s really important not to forget the slip stitch to start with.
One thing I did find with the Clover hairpin lace tool is that it feels incredibly awkward with any yarn finer than Aussie 8 ply (DK weight). I ended up switching to a Pony brand hairpin staple in size 4 to work with the fingering weight yarn in these samples and immediately found it a lot easier. Next time I get to the newsagent I’ll pick up a pack of large paperclips to see what I can do with those.

I suppose I should sew my skirt while I wait for my yarn to arrive, but first a cup of tea…