
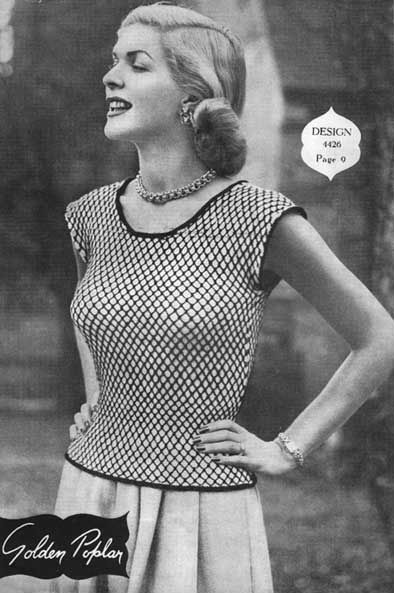
This vintage knitting pattern for the “Golden Poplar” t-shirt was first published in the 1940’s. It features a clever lattice colour stitch pattern that creates a gridwork over the top.
It is sized to fit a 32-34 inch bust.
This knitting pattern uses old UK needle sizes and fingering weight yarn.
Materials
3 skeins “Twin-Prufe” 3-ply fingering wool, shade No. 1075 (white), 2 skeins shade no. 1016 (Black).
2 prs. needles, Nos. 10 and 12.
1 crochet hook.
Measurements
Length from top of shoulder, 22in. Bust, 32/34in.
Note: For 36in. bust, use No. 9 instead of No. 10 needles.
Abbreviations
W = white
B= black
Tension
7 sts 1in., 9 rows 1in.
Pattern
Back
Using No. 10 needles and B wool, cast on 117 sts Work 4 rows st. st.
Change to W wool, K 1 row.
Work in the following pattern:
1st Row: (Wrong side) P 1B, * pass B wool to back, sl. 3 purlwise, bring B wool to front, carrying it loosely across sts, P 1B, repeat from * to end.
2nd Row: Using W wool, K.
3rd Row: Using W wool, P.
4th Row: K 2W, * insert right-hand needle under loop in B wool on 1st row and into next st. on left-hand needle and K. both tog. with B wool, K 3W, repeat from *, ending row with 2W instead of 3W
5th Row: P 2W, 1B, * pass B wool to back of work, sl. 3, bring B wool to front, P 1B, repeat from * to last 2 sts P 2W
6th Row: Using W wool, K.
7th Row: Using W wool, P.
8th Row: K 1B, 3W, * insert right-hand needle under loop in B wool on 5th row and into next st. on left-hand needle and K. both tog. with B wool, K. 3W, repeat from * to last st., K 1B
Repeat these 8 rows for 4-1/2in.
Change to No. 12 needles and continue in pattern for 2in.
Change to No. 10 needles and when work measures 14-1/2in., cast on 2 sts at the beginning of the next 2 rows, then increase 1 st. each end of every 8th row (to form cap sleeves) until increased to 133 sts
Next Row: Work 48 sts (leave on a spare needle), cast off 37 sts, work 48 sts
Continue on last 48 sts and K2tog at neck edge every row and at the same time increase 1 more st. at armhole edge on the 8th row.
When decreased to 39 sts and armhole measures 7in., shape shoulder by casting off 13 sts at armhole edge every 2nd row 3 times.
Join wool at neck edge and work other side to correspond.
Front
Work the same as for back until increased to 129 sts
Next Row: Work 56 sts (leave on a spare needle), cast off 17 sts, work 56 sts
Continue on last 56 sts, still increasing 1 st. at armhole edge every 8th row 3 more times, and at the same time K2tog at neck edge of the next 10 rows, then every 2nd row 10 times (39 sts).
When armhole measures 7in., shape shoulder by casting off 13 sts at armhole edge every 2nd row 3 times.
Join wool at neck edge and work other side to correspond.
Neckband
Using No. 12 needles and B wool, with right side of work toward you, pick up and K. 120 sts around front of neck.
P 1 row, K 1 row, P 1 row.
Cast off loosely. Work the back the same way, picking up 100 sts instead of 120 sts
Armbands
Join shoulder seams.
With right side of work towards you, using No. 12 needles and B wool, pick up and K. 130 sts around armholes and work the same as for neckband.
To Make Up
Press with a warm iron and damp cloth. Sew up seams. Fold neckband, armbands and lower edge in half and stitch back on to wrong side of work.