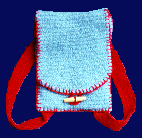
I designed this backpack for my daughter’s third birthday. Fulling the knitting makes a nice firm fabric, and the whole thing only weighs just over 150 grams.
It is designed to fit a 90-100cm tall child. Lengthen the straps for a taller child.
Materials
- 150 grams (after promising to be good I’ve gone and used a yarn of unknown yardage) 12 ply yarn in main colour. This must be 100% wool and cannot be either shrink resist or machine wash treated.
- 50 grams of a contrast 12 ply yarn (I used Patons Fireside at 63 metres per 50gms). This can be of any fibre content as you’re not going to shrink it.
- I used light blue for the main body of the backpack and bright red for the straps and stitching.
- 1 50mm toggle.
- 1 pr 7mm knitting needles.
- 1 pr 5mm knitting needles.
Tension
14sts and 18 rows to 10cm over garter st on 7mm needles.
Pattern
Body
Using 7mm needles and your main colour, cast on 30sts. K 140 rows. K2tog at each end of the next 8 rows. Cast off.
Now comes the fun part, you get to shrink it on purpose! Weave in all the loose ends and throw your lovely freshly knitted piece of fabric in the washing machine on hot wash with a little detergent. Keep a close eye on it and remove it when it measures roughly 16 x 64 cm. A few centimeters difference in either direction is not going to matter but opt for over 16cm in width rather than under. If you’re having trouble getting it to shrink throw it in the tumble dryer on the hot setting. BE MERCILESS!
Clean the lint out of your washer and dryer 8-).
Straps
How to work linen st
Row 1: (RS) K1 *yfwd, sl 1 purlwise, ybk, K1; rep from * to end.
Row 2: P2, *ybk, sl 1 purlwise, yfwd, P1; rep from * to last st, P1.
Using contrast yarn and 5mm needles cast on 9 sts and work in linen st until straps measure 24cm longer than the made up body of the back pack (mine are 48cm). Cast off. Darn in the ends on the RS (these won’t show when you have sewn the straps on), block. Work a decorative running st down either edge of the straps in a contrasting colour.
Make 2
Making Up
Fold the body of the backpack into rough thirds so as to resemble a bag with flap (the flap being several inches shorter than the length of the bag section). With the front facing you and starting at the bottom left hand corner, sew the bag together using a neat blanket st. Work up the side, across the front of the opening, down the other side and across the bottom. Then take a fresh piece of contrast yarn and work blanket st around the flap to match.
Sew the toggle in the centre front, just beneath the flap. With contrast yarn make a button loop on the centre edge on the underside of the flap just large enough to go over the toggle comfortably. Work buttonhole st around the loop to make it strong.
Attach the straps on the back at the points marked on illustration a), making sure to fold the ends of the straps under instead of laying them flat (see illustration b).
a)
b)
This pattern and all images on this page are Copyright © Sarah Bradberry April 1996. All rights reserved.
